|
Assembling the PC
| ||
|
Page 6
| ||
|
| ||
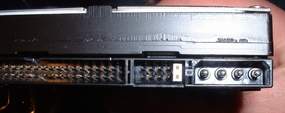
| Ensure that the hard drive is set up to be the master drive on its IDE cable. Each IDE cable can support up to two IDE devices, such as hard-drives, CD-drives, Zip Drives, etc., but in order for this to work, one IDE device must be designated as a master device, and one must be designated as a slave device. You cannot have two master devices or two slave devices on a single cable. This must be later configured in the BIOS. |
|
|
Examine the top of your hard-drive. There should be a chart there depicting the necessary jumper settings to make the drive a master or slave device. Otherwise, the chart will be somewhere on the body of the drive. The set of jumpers will be on the back end of the drive. Ensure that they are set correctly to enable the drive as a master. You may need a set of tweezers to move the jumpers. Insert the hard drive into the 3.5" drive-tray and screw it in securely on both sides. |
|
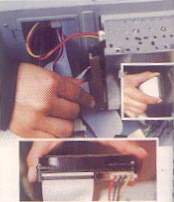
Ensure that at least one full sized 5.25" bay is open in the case. Examine the jumper settings on the top of the drive, as you did with the hard-drive. Ensure that the drive is set to 'master'. If your case came with rails, screw them to the sides of the CD drive and insert it into the front of the case until it clicks into place. Otherwise, slide the drive into the front of the computer until the faceplate of the drive is flush with the front bezel of the case and the screw holes along the side of the drive line up with the case. Then, screw it in securely on both sides. Attach the power cable (same as the hard-drive power cable) to the drive. Attach your secondary IDE cable to the drive. Note that generally this should be a regular 40-wire IDE cable, not the 80-wire UDMA IDE cable that is used for the hard-drive. Some DVD drives will use the 80-wire cable, however. Set the jumper on the CD-ROM drive. Here you have a choice. You can either:
|

|